Toolbar editor
Overview: toolbar in the emulation window
The lower area of the emulation window usually contains buttons
used for frequent requests.
By clicking on this toolbar, you can trigger these operations,
for example, F1: send the F1 key to the host.

The structure of the toolbar can be
customized as required.
- System administrators usually perform these customizations when configuring the system:
from the default menus, administrators select the appropriate menus for their implementation
and make the menus available for their users as completed toolbar files.
- From this list, users simply select the appropriate toolbar file.
- You can also specify where the toolbar should appear,
for example, in the lower or upper area of the emulation window.
However, if required, you can also individually customize the toolbar
by using the Toolbar Editor.
Overview: toolbar editor
By using the toolbar editor, you can
individually customize the toolbar in the emulation window,
and then save your modifications as toolbar files on the server.
Special programming knowledge is not required.
The procedure is described in more detail below:
- You start the toolbar editor in the emulation window.
- You select a toolbar entry in the emulation window.
- You can move,
remove or update the selected entry.
- You can insert a new entry
that you select from an overview of functions.
- You can undo your changes one at a time.
- You can save the modified toolbar as a toolbar file.
You immediately see the results of these changes before you exit the toolbar editor.
If required, you can also perform special tasks such as:
- Loading or deleting another toolbar file.
- Directly editing the generated JavaScript source code of the current toolbar file.
Note:
- The toolbar system of the LogWeb/Ajax is written in JavaScript (as are all components).
- To customize the toolbar, you can also directly modify the JavaScript source code
in the toolbar files,
which requires the corresponding programming knowledge.
- The toolbar editor simplifies the customizing process
by automatically generating the required JavaScript source code for you.
- The toolbar editor gives you a overview of functions
with the most important functions that you can easily select.
Starting, using and exiting the toolbar editor
You usually start the toolbar editor
by selecting [Extras]/[Configure]/[Toolbar]/[Edit] in the emulation window.
Contact your system administrator if this item
does not appear in your emulation window.
To exit the toolbar editor, click the X symbol in the title bar.
You can then resume your work in the emulation window.
The toolbar editor is displayed as a dialog in the emulation window.
Basic operation:
- You can move the dialog as usual to an appropriate position in the emulation window
(click the blue title bar with the mouse and then drag it)
or modify the size
(click the blue area with the mouse and then drag it).
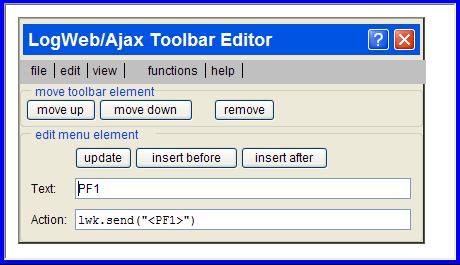
- In the toolbar editor, you use the fixed menu bar to access important functions such as:
- File: Exit the toolbar editor, as well as
save, load or delete the toolbar file.
- Edit: Undo changes, as well as
edit the current JavaScript source code directly.
- View: Set the toolbar position in the emulation window.
- Functions: Display the overview of functions for selection.
- The move toolbar element area below is used to easily
move or remove
a selected toolbar entry.
This contains buttons that are only visible if you
select a toolbar entry in the emulation window.
- In the edit menu element area below, you can
update a selected menu entry or
insert a new entry.
Note:
- Before you can edit a toolbar entry,
you must select it in the emulation window.
- You can undo the changes one at a time,
by selecting [Edit]/[Undo] in the toolbar editor.
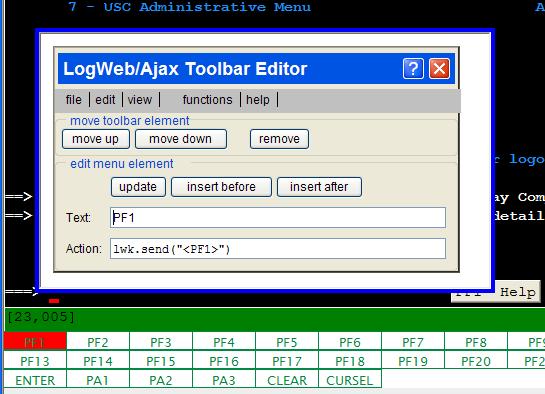
Selecting a toolbar entry
Before you can edit a toolbar entry, you must select it in the emulation window.
- Move the mouse over the toolbar in the emulation window.
- Click on the element that you want to select.
- The selected element is displayed in red in the emulation window.
- The properties of this element are displayed in the toolbar editor.
- You can then
move,
remove,
update
or insert a new toolbar entry.
In the following example, the toolbar element F1 is selected in the emulation window:
It appears with a plain-colored background,
and its properties are shown in the toolbar editor in the fields "Text" und "Action" fields:
Note:
- As long as the toolbar editor is loaded,
clicking the menu bar or toolbar in the emulation window does not execute the usual functions;
instead, the specified toolbar element is selected and appears in red.
- By re-selecting the same element, you cancel the selection.
- You can change your selection at any time
by clicking another element.
Moving or deleting a toolbar element
In the upper section of the toolbar editor,
you can use the buttons under move toolbar element to move or delete
the selected toolbar element:
- You must first select a menu selection in the emulation window.
- The buttons for moving or deleting the element are found in the toolbar editor under move toolbar element.
Note:
- You can also move the "line break" at the end of a toolbar line.
- You cannot delete the last entry in a toolbar.
- You can undo the changes one by one
by selecting [Edit]/[Undo] in the toolbar editor.
Modifying a toolbar entry
For every element, you can easily modify the text displayed in the toolbar:
- You must first select the corresponding toolbar entry in the emulation window.
- In the lower section of the toolbar, edit toolbar element, the properties of the selected element are displayed.
- You can now modify the Text that displayed in the toolbar.
- Click "update".
Note:
- The JavaScript function is displayed for your reference in the Action field,
which is triggered when the toolbar entry is activated.
You should generally not modify these parameters.
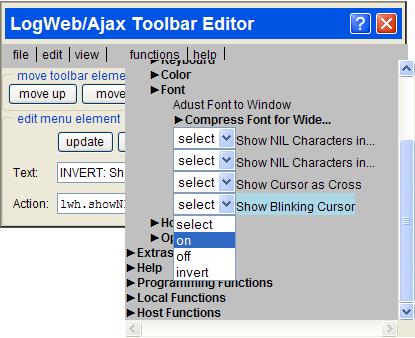
Adding a new toolbar entry
You can select additional functions from the overview of functions and add them to your toolbar:
- You must first determine where to insert them
by selecting a toolbar entry in the emulation window.
- On the editor menu, now click "functions".
The list of available functions opens.
- On the functions menu, select the required entry.
In the lower section of the menu editor, the properties of the selected entry are displayed.
- Click the Text field.
- The overview of functions disappears and you can
now update the Text.
- Click one of the "insert" buttons.
Note:
Undoing a change
You can undo all the changes that you make.
- In the editor menu, select [Edit]/[Undo].
- The last change is undone.
- The toolbar display in the emulation window is reset accordingly.
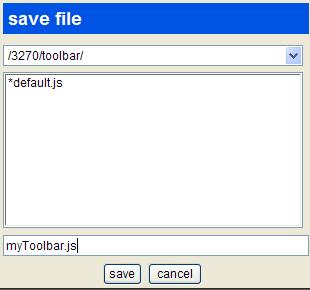
Saving a toolbar file
All changes that you make using the toolbar editor
are instantly displayed in the emulation window;
However, you must save them specifically if you want them to remain available
after restarting the emulation.
- In the editor menu, select [file]/[save file as].
- The "save file" dialog is displayed.
- Enter a name for the toolbar file.
- Click "save".
- If you click "cancel", the toolbar file is not saved.
Note:
- You cannot undo "save file" by using [Edit]/[Undo].
However, you can delete the file on the server.
- If you are not authorized to save files,
this could be due to your system settings.
In this case, contact your system administrator.
- You can only save files on the server.
Only the system administrator can give other users access to these files.
Loading a toolbar file
If required, you can also load another toolbar file in the editor
and then edit this file:
- In the editor menu, select [file]/[open file].
- The "open file" dialog is displayed.
- Select the toolbar file that you require.
- Click "open".
The file is loaded and the toolbar is displayed in the emulation window.
- If you click "cancel", the toolbar file is not loaded.
Note:
- If you load a toolbar file, this will overwrite the previous toolbar.
- You can restore this toolbar
by clicking undo.
- You can only load files from your user directory or from your group directory.
Only the system administrator can give you access to files belonging to other users or groups.
Deleting a toolbar file
If necessary, you can delete a toolbar file which is no longer required on the server:
- In the menu editor, select [file]/[remove file].
- The dialog "remove file" is displayed.
- Select the toolbar file that you require.
- Click "remove".
- If you press "cancel" instead, the toolbar file is not deleted.
Note:
- If you are not authorized to delete files,
this could be due to your system settings.
In this case, contact your system administrator.
- You can only delete files from your user directory on the server.
Only the system administrator can delete files belonging to other users or group files.
- You cannot undo"remove file" as usual by using [Edit]/[Undo].
Displaying and directly changing a source text
It is usually sufficient to edit toolbars with the toolbar editor options. If required, however, the generated source code can be displayed
and changed directly.
- In the editor menu, select [edit]/[edit JavaScript source].
- In the toolbar editor, a text area appears with the JavaScript source code.
- You can change the source code.
- You apply your changes by clicking "update".
- If you clear the "edit current source" check box,
your changes are lost.
- In both cases, the source code is hidden again.
Note:
- You can get an introduction to the generated JavaScript source code
in the description of the toolbar files.
- To make changes to the source code of the JavaScript toolbar file, the corresponding programming knowledge
and knowledge of the LogWeb/Ajax programming interfaces is required
(API ).
- You can also undo changes that you made in the source code,
by selecting [edit]/[undo] in the toolbar.
© Logics Software 2006 - 2009